Navmesh
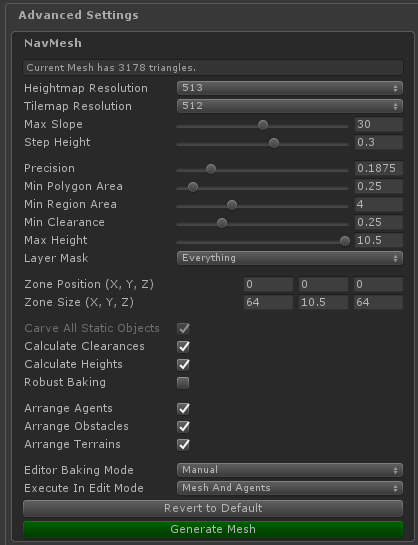
Heightmap Resolution
Resolution of the NavMesh Heightmap.
The Heightmap is used for baking the navigation mesh and also for height queries, agent height positioning and triangulation rendering.
Higher Heightmap resolutions can result in a higher quality NavMesh baking where the mesh generation process can detect smaller world details with more precision. Increasing the heightmap resolution, however, will greaty increase the time it takes to bake a NavMesh and will also make larger Heightmap files. Heightmap resolution has little no impact on runtime performance other than memory usage.
Tilemap Resolution
Resolution of the Tilemap used for NavMesh baking.
Higher Tilemap resolutions can result in higher quality NavMesh baking, but will significantly slow down the baking process. It is recommended to use lower values for grid based worlds if fast baking is desired. The Tilemap is used exclusively for NavMesh baking and will not affect runtime performance at all.
Max Slope
Maximum slope angle the agents can walk over.
The maximum slope angle defines which slopes or ramps agents are able to traverse. If a ramp has a slope angle lower than the Max Slope variable, then the agent will be able to walk up that ramp.
Setting this value too high can result in poorly defined obstacles contour, while setting it too low can result in agents not being able to walk up some ramps.
This variable is defined in degrees.
Step Height
Maximum step height the agents can walk up.
The step height defines which steps the agent can walk up or not. If a stairs have steps which are lower than the Step Height variable, then agents will be able to walk up those stairs.
Setting this value too high can result in agents being able to walk up obstacles that they should not be able to, while setting it too low can result in agents being unable to walk up stairs.
This variable is defined in meters.
Precision
NavMesh baking precision.
The Precision variable defines how much the polygon decimation process can simplify the obstacles contour during NavMesh Baking.
Larger precision values will generate simpler polygons with less vertices, which also results in triangulations with less triangles, whereas lower precision values will preserve the obstacles contour more.
Setting this value too high can result in poorly defined obstacle contour, while setting it too low can result in obstacles not being simplified enough, giving them a pixelized look.
Precision can affect runtime peformance by reducing or increasing the number of mesh triangles. A NavMesh with more triangles will be slower than a NavMesh with fewer triangles.
It is recommended to use a value that simplifies your polygons just enough to remove excessive vertices and the grid-like aspect of the contour.
This value is defined in meters.
Min. Polygon Area
Minimum polygon area filter for NavMesh baking.
Polygons whose area is smaller than this variable will be completely ignored during the baking process. This includes both areas that are obstructed $($Obstacles$)$ and areas that are not obstructed $($Walkable areas$)$.
Increasing this value can remove undesired noise from the navigation mesh, but setting it too high can cause the baking process to completely ignore some obstacles.
This value is defined in square meters.
Min. Region Area
Minimum region area filter for NavMesh baking.
Polygons whose area is smaller than this variable and are walkable areas will be completely ignored during the baking process. This will result in these small areas that should be walkable being considered obstacles and unwalkable.
Increasing this value can remove areas that are too small for agents, but setting it too high can result in some areas that should be walkable to be considered obstacles and unwalkable.
This value is defined in square meters.
Min. Clearance
Minimum area clearance filter for NavMesh baking.
Walkable tiles whose clearance value is smaller than this value will be flagged as obstacles and unwalkable. This will result in thin corridors not being added to the NavMesh as walkable areas.
Setting this value too low can cause the navigation mesh to consider narrow corridors in it's triangulation, whereas setting it too high can remove corridors that should be walkable. This variable has a huge impact on baking performance, and it is recommended to set it to zero for runtime baking if baking speed is important.
It is important to note that even if this value is set to 0, and te triangulation takes corridors that are too narrow, agents whose collision radius are too large for this corridor width will still be unable to traverse it. However, for these cases to work properly, the mesh must have Calculate Clearances set to true.
For editor mesh baking, it is recommended to set this value to the minimum agent size. For runtime baking, it is recommended to set this value to zero.
This value is defined in meters.
Max. Height
Maximum NavMesh walkable height filter.
Any tile with height greater than this value will be treated as unwalkable.
Setting this value too low can result in some walkable areas be considered not walkable because they are too high.
This value is in meters.
Layer Mask
Layer Mask filter for NavMesh baking.
Any obstacle whose layer is not in this Layer Mask will be ignored during the baking process.
This layer mask should contain all layers used by obstacles that should be considered by this Navigation Zone.
Zone Position
The zone world position.
This is the same as the Tranform position.
The zone's volume should contain all of it's obstacles.
This value is in meters.
Zone Size
The zone world size.
This is not the same as the Transform scale.
The zone's volume should contain all of it's obstacles.
This value is in meters.
Scan Colliders
Toggles scanning all scene Colliders when baking the NavMesh.
This will add a Obstacle Component to any GameObject with a Collider. Note that Agents with collliders will not be considered during this scan.
Scan Meshes
Toggles scanning all scene Meshes when baking the NavMesh.
This will add a Obstacle Component to any GameObject with a Mesh. Note that Agents with collliders will not be considered during this scan.
Calculate Clearances
Toggles calculating of triangle clearances.
Triangle clearance is used to tell whether or not a path for an agent can traverse a triangle according to the agent's collision radius.
This process slows down the triangulation process both during NavMesh baking and during NavMesh runtime updates.
It is recommended to turn this feature on if there are narrow corridors on the navigation mesh that larger agents cannot traverse. If all agents can traverse all corridors on the mesh, then this can be turned off for runtime performance gains.
When unsure on how to use this variable, set it to true.
Calculate Heights
Toggles Triangulation Vertex height calculation.
Triangulation Vertex height is used exclusively for NavMesh rendering. It does not have any impact on the physics outcome of the navigation algorithm.
Calculating heights can have some impact on both NavMesh baking and Triangulation runtime updates.
When NavMesh rendering is desired, set this value to true.
Robust Baking
Toggles robust polygon decimation during NavMesh baking.
By default, polygon decimation will remove any unnecessary vertices from the polygons according to the zone's precision value. This operation, however, can cause polygons to intersect each other. Turning Robust Baking on can prevent this intersection from happening.
Robust Baking is only important if the zone's precision value is too high, which can cause polygon decimation to remove more vertices than it should.
Robust Baking has a huge impact on NavMesh baking, and should be turned off for runtime baking if speed is important.
It is recommended not to use this feature unless NavMesh errors are encountered.
Arrange Agents
Toggles parenting Agents under the zone transform.
Arrange Obstacles
Toggles parenting Obstacles under the zone transform.
Arrange Terrains
Toggles parenting Terrains under the zone transform.
Editor Baking Mode
Automatic Editor Baking Mode allows the NavigationZone to periodically bake the navmesh to keep it completely updated with the scene. This feature allows the user to continuously make changes to the scene and have the navmesh update automatically to accommodate the changes. This feature only has effect on the editor, while not playing, and if the scene has pending unsaved changes. It is recommended to always click the Generate Mesh button and wait for the bake process to complete before saving the scene to ensure the mesh is baked and saved along with the scene.
- Automatic: While not in play mode, the NavMesh will automatically bake every few seconds.
- Manual: The NavMesh will not bake periodically, and the Generate Mesh button must be used to bake the NavMesh in the editor.
Even though most of the mesh baking runs in the background, automatic baking can cause some lag spikes in the editor, and it is recommended to turn it off when experiencing lag problems.
It is important to know that changes made during these updates cannot be undone with the editor Undo operation.
Execute In Edit Mode
Execute In Edit Mode will run most of the navigation algorithms while not in play mode. This allows the NavMesh to automatically update when dynamic obstacles are added or moved on the editor, and also allows agents to collide with obstacles and other agents.
- Mesh And Agents: Both NavMesh and Agents will be updated while not in play mode.
- Mesh Only: Only the mesh will be updated while not in play mode.
- Agents Only: Only the agents will be updated while not in play mode.
- None: NavMesh and Agents will be updated while not in play mode.
It is important to know that changes made during these updates cannot be undone with the editor Undo operation.
Revert To Default
Reverts all the NavZone settings to the default recommended values. These values may differ depending on the Heightmap Resolution and Tilemap Resolution variables.
Generate Mesh
Starts baking a new NavMesh for this Navigation Zone using the above settings.
Once started, NavMesh baking runs on the background and is automatically saved on the Navigation Zone when the process is complete. Note that this does not save the scene itself, and changes will be lost of the scene is not saved. It is recommended to wait for the bake process to end before saving the scene.
Pathfinding
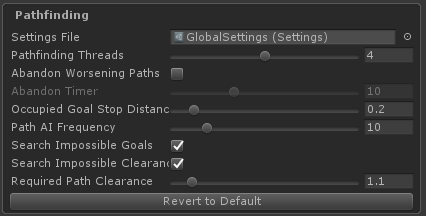
Pathfinding Threads
Number of threads to use for pathfinding.
If zero, then all pathfinding will be done on the main thread upon request. This can cause FPS drop if there are too many long paths being calculated every frame. If greater than zero, then all pathfinding will be done using background threads, and pathfinding will not have any impact on the main thread performance.
It is recommended not to use at least two threads for pathfinding.
Abandon Worsening Paths
If set to true, then agents will automatically abandon their paths when they have not had progress towards the goal for some time.
This is useful when it is desired for agents to stop if their goal is blocked by other agents that are not moving out of the way. However, it is often common for agents to have a hard time finding path progress when they are in a crowded area, and abandoning their paths could lead them to giving up on a path that they would eventually complete.
Abandon timer
Time in seconds with no progress towards the goal before agents abandon their paths.
Setting this value too low can result in agents abandoning their paths too early when they could eventually complete the path. Setting it too high can cause agents to take too long to give up on paths that cannot be completed.
Occupied Goal Stop Distance
Distance to stop from goal if the goal is occupied by another agent when stopIfGoalOccupied parameter is set during Agent.SetDestination.
This value is relative to agent radius. An agent of radius 0.50, will stop 0.10 meters away from the goal if this variable is set to 0.20.
Path AI Frequency
Frequency in simulation steps for agents to take Path AI decisions such as abandoning the path or stopping if the goal is occupied.
A frequency of 10 means that the agent will evaluate it's path progress every 10 simulation steps.
Search Impossible Goals
If set to true, pathfinding will search for the nearest reachable goal when the path goal cannot be reached.
A path goal cannot be reached if it is on a different component than the start $($if it is on another island, for example$)$. In this case, if Search Impossible Goals is set to true, the Pathfinder will search for the point on the start component nearest to the desired goal, and the pathfinding will continue with that new goal.
When turned off, if the goal cannot be reached, the pathfinder will fail to find a path and will return an empty path.
This variable does not have a significant impact on pathfinding performance.
Serch Impossible Clearances
If set to true, pathfinding will continue searching for paths when the goal could not be reached for clearance reasons.
A goal is unreachable for clearance reasons when the agent cannot traverse a narrow corridor because the agent's collision radius is too large for the corridor clearance.
When set to true, if the goal cannot be reached for clearance reasons, then the Pathfinder will calculate a path up to the corridor that was too narrow and the agent was unable to traverse.
In cases where the path from start to goal is possible, this variable has no impact on pathfinding performance. However, when needed, and if this variable is set to true, the pathfinder will take up to three times as long to find a path.
Required Path Clearance
This value increases the clearance required for agents to consider a corridor traversable.
Mathematically, an agent of radius 0.60 would be able to traverse a corridor of width 1.20. But with a Required Path Clearance of 1.10, an agent of radius 0.60 would require a corridor with clearance of 1.32 to consider it a valid option for pathfinding.
Revert to Default
Reverts the Pathfinding settings to the default recommended values.
Collision Avoidance
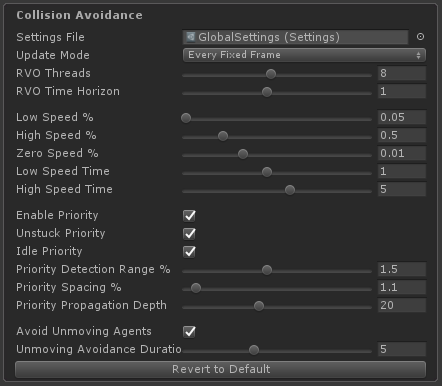
Update Mode
- Every Frame: The Navigation Zone will run a simulation step every frame update.
- Every Fixed Frame: The Navigation Zone will run a simulation step every fixed frame update.
Since movement is physics related, and physics is usually calculated inside the fixed frame update, it is recommended to use Every Fixed Frame option for the Update Mode.
It is important to note that the simulation time step will adjust to the selected update mode.
RVO Threads
Number of threads to use for collision avoidance.
Even though all collision avoidance is done within the main thread scope, having more than 1 threads working on collision avoidance can significantly increase the collision avoidance performance on the main thread, as the work will be spread across multiple threads.
On zones where there will be more than 20 agents at any given time, it is recommended to use more than one thread for collision avoidance.
RVO Time Horizon
Time horizon in seconds for agents to detect and start avoiding future. collisions.
Higher values allows agents to start avoiding collisions that are further away, whereas lower values will cause agents to start avoiding collisions only when they are nearly happening.
If set to nearly or exactly zero, then agents will only avoid collisions a moment before it happens.
Low Speed Percentage
Speed percentage at which agents are considered to be under-performing their movement capabilities.
The speed percentage for an agent equals it's currentSpeed divided by it's movementSpeed. An agent of movementSpeed 2.0 and currentSpeed 1.0 has a current speed percentage of 0.50.
Agents that are under-performing are candidates for being considered stuck. Agents considered stuck receive an internal movement priority that allows them to get unstuck. This is particularly useful on crowded narrow corridors along with the Unstuck Priority variable set to true.
Agents whose speed percentage stay below this value for long enough are considered stuck.
Setting this value too high will cause agents to be considered stuck when they are not actually stuck. Setting it too low can cause agents to never be considered stuck.
It is recommended to set this value around 0.05 $(5%)$. In case agents get stuck for too long, increasing this value can sometimes solve the situation.
High Speed Percentage
Speed percentage at which agents are considered to be performing their movement capabilities well enough.
The speed percentage for an agent equals it's currentSpeed divided by it's movementSpeed. An agent of movementSpeed 2.0 and currentSpeed 1.0 has a current speed percentage of 0.50.
Agents that are under-performing are candidates for being considered stuck. Agents considered stuck receive an internal movement priority that allows them to get unstuck. This is particularly useful on crowded narrow corridors along with the Unstuck Priority variable set to true.
Agents whose speed percentage stay above this value for long enough are not considered stuck.
Setting this value too high will cause agents to be considered stuck when they are not actually stuck. Setting it too low can cause agents to never be considered stuck.
It is recommended to set this value around 0.50 $(50%)$. In case agents get stuck for too long, increasing this value can sometimes solve the situation.
Zero Speed Percentage
Speed percentage at which agents are considered to not be currently moving.
Agents are not likely to have their speed at exactly zero. Instead, it will be nearly zero. This percentage value allows to considered speeds that are too low to equal zero.
An agent that has zero speed is a candidate for different collision avoidance approaches than agents that are moving.
Setting this value too low can cause these different collision avoidance approaches to never trigger, whereas setting ti too high can cause these approaches to trigger on the wrong situations. An example of such different collision avoidance approach is the Avoid Unmoving Agents, which is responsible for a group of agents being able to completely surround another agent.
It is recommended to set this value to 0.01 $(1%)$. In case agents are not being able to avoid collisions with agents that seem to not be moving, increasing this value can sometimes solve the situation.
Low Speed Time
Time in seconds for agents to be considered stuck when under-performing.
If an agent has been under-performing it's movement capabilities for this long, then it will be considered stuck and will be a candidate for anti-stuck routines.
It is recommended to set this value around one second. Increasing the value can cause agents to take too long to be considered stuck. Decreasing it can cause agents to be considered stuck too early.
High Speed Time
Time in seconds for agents to no longer be considered stuck after performing their movement capabilities well enough.
If an agent has been above High Speed Percentage for this long, it will not be considered stuck and will no longer be a candidate for anti-stuck routines.
It is recommended to set this value around five seconds. Increasing the value can cause agents to be considered stuck for too long. Decreasing it can cause agents to not be considered stuck for long enough for them to get unstuck.
Enable Priority
Toggles collision avoidance priority during collision avoidance calculation.
Each agent can have a collision avoidance priority variable assigned to it. Enabling this variable allows the agents to use their collision avoidance priority during collision avoidance calculations, and also allows the internal algorithms to assign priority to agents as needed to get agents unstuck.
When calculating collisions, the agent with higher priority will move in a straight line while the agent with lower priority will be responsible for all the collision avoidance. If both agents have the same collision avoidance priority, then each will take half of the collision avoidance responsibility.
If disabled, then the collision avoidance priority assigned to agents will have no effect whatsoever.
Unstuck Priority
Toggles assigning internal high priority values to agents that are stuck to get them unstuck.
If enabled, agents that are considered stuck will have collision avoidance priority over agents that are not considered stuck.
Idle Priority
Toggles assigning internal low priority values to agents that are Idle.
If enabled, agents that are Idle will have a lower collision avoidance priority than other agents that are not Idle.
This rule only applies to agents with friendly team relationship.
Priority Detection Range
Priority detection distance relative to the agent radius.
The detection distance in meters is calculated by multiplying the combined radius of the two agents avoiding collision with one another by this variable. An agent of collision radius 0.50 avoiding collision with another agent of collision radius 0.60 will have a combined radius of 1.10 and a priority detection range of 1.65 meters when this variable is set to 1.50.
Agents will only start using priority rules with another agent when within this distance of it.
This value should never be less than one.
Priority Spacing Percentage
Agent spacing relative to agent radius to maintain when priority rules are being applied.
The spacing in meters is calculated by multiplying the combined radius of the two agents avoiding collisions with one another by this variable. An agent of collision radius 0.50 avoiding collision with another agent of collision radius 0.60 will have a combined radius of 1.10 and a priority spacing of 1.21 meters when this variable is set to 1.10.
This value should never be less than one.
Propagation Depth
Maximum recursion depth for internal priority propagation.
This value will prevent performance problems when there are too many agents grouped up. The default value is 20. Increasing it can increase the quality of the unstuck algorithm, but can also affect performance on the main thread.
If Unstuck Priority is set to false, then this variable will have no effect.
Avoid Unmoving Agents
Enables the use of different collision avoidance algorithms to deal with agents that are not moving.
These algorithms are responsible for the Agent Surround Behavior, which allows group of agents to completely surround another agent, or for the agent to get away from that same situation.
Turning this off can improve performance in some cases.
Unmoving Avoidance Duration
Time in seconds for agents to forget their previous unmoving behavior when not using it.
Internally, the unmoving behavior gives each agent a direction to follow $($left or right$)$. Forgetting the unmoving behavior, means that the agent will discard it's current direction and get a new one.
Recommended value is five seconds. Increasing this value can help agents overcome some situations, but will not allow them to quickly reset behavior for new situations. Decreasing this values can cause agents to forget their direction too often and make it impossible for them to solve some situations.
Revert to Default
Reverts all collision avoidance settings to the default recommended settings.
Agent
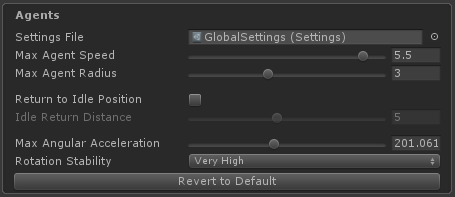
Max. Agent Speed
Maximum allowed agent movement speed in meters per second.
This value is used internally to know how far to search for agent neighbors when calculating collision avoidance.
While using agents with movement speed higher than this in the scene would not be critical to the application, it could cause collision avoidance to ignore agents that are moving faster than this.
Setting this value too high can result in larger neighbor search radius, which makes collision avoidance calculation slower. It is recommended to globally define a maximum agent movement speed for the game and put this value here.
Max. Agent Radius
Maximum allowed agent radius in meters.
This value is used internally to know how far to search for agent neighbors when calculating collision avoidance.
While using agents with collision radius larger than this in the scene would not be critical to the application, it could cause collision avoidance to ignore agents that are moving too fast.
Setting this value too high can result in larger neighbor search radius, which makes collision avoidance calculation slower. It is recommended to globally define a maximum agent collision radius for the game and put this value here.
Return to Idle Position
Toggles agents automatically returnin to their Idle position when they get pushed away from it.
Idle agents can get pushed away from their position due to collision avoidance. Enabling Return to Idle Position makes them return to their original Idle position when they become too far away from it.
Idle Position Distance
When Return to Idle Position is enabled, this will be the distance in meters from the original Idle position for agents to start returning to their original Idle position.
Max Angular Acceleration
Angular acceleration used for agent rotation in radians per seconds squared.
Each agent rotation speed is limited by their rotationSpeed variable, but they will not accelerate their rotation speed more than this.
Lower values will make the agents orientation more stable. If set to zero, then agents will have infinite acceleration and agents will always rotate using their rotationSpeed variable.
Rotation Stability
Quality of agents rotation stability.
Collisions can often cause agents to rotate too much. This variable offers rotation stability in a way that agents will use their average velocity over the last steps to calculate their current orientation.
Higher values can make agents seem like they are sliding sideways instead of moving forward. Lower values can make agents rotate too much in crowded environments. If set to None, then agents will use their current velocity as their current orientation.
Revert to Default
Reverts the Agent settings to the default recommended settings.
Rendering
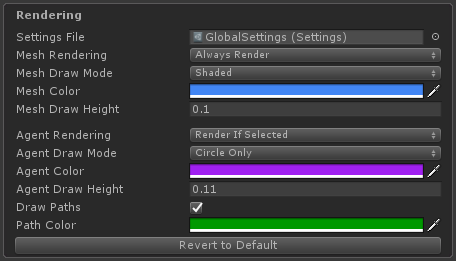
Mesh Rendering
- Always Render: NavMesh will always be rendered.
- Render If Not Playing: NavMesh will only render in the editor while not in play-mode and will not render outside the editor.
- Render If Playing: NavMesh will only play in the editor if in play-mode and will always render outside the editor.
- Render If Selected: NavMesh will only render in the editor if it is selected and will never render outside the editor.
- Never Render: NavMesh will not be rendered.
Mesh Draw Mode
- Shaded: Triangles interior will be rendered.
- Wireframe: Triangles interior will not be rendered.
Color
Material color for rendering the NavMesh.
Mesh Draw Height
NavMesh vertices height offset in meters.
Default value is 0.10. Increasing this value can cause your triangles to float above the surface. Decreasing it can cause some vertices to hide under the surface.
Agent Rendering
- Always Render: Agents will always be rendered.
- Render If Not Playing: Agents will only render in the editor while not in play-mode and will not render outside the editor.
- Render If Playing: Agents will only play in the editor if in play-mode and will always render outside the editor.
- Render If Selected: Agents will only render in the editor if it is selected and will never render outside the editor.
- Never Render: Agents will not be rendered.
Agent Draw Mode
- Circle Only: Only the agents collision radius will be drawn.
- Circle And Arrow: Both the agents collision radius and orientation will be drawn.
Agent Color
Material color for rendering agents.
Agent Draw Height
Agent draw height offset in meters.
Default value is 0.10. Increasing this value can cause the agent drawings to float above the surface. Decreasing it can cause some vertices to hide under the surface.
Draw Paths
Toggles drawing paths for agents that are being drawn.
Path Color
Material color for rendering paths.
Debug

Debug Mode
Toggles the display of debug messages.
Log Messages
Toggles the display of informative messages.
Log Warnings
Toggles the display of important warning messages.
Log Errors
Toggles the display of critical error messages.
Revert to Default
Reverts the Debug settings to the default recommended values.